JEST
Test Driven Developement
- 테스트 주도 개발은 매우 짧은 개발 사이클을 반복하는 소프트웨어 개발 프로세스 중 하나이다.
개발자는 먼저 요구 사항을 검증하는 자동화된 테스트 케이스를 작성한다. 그런 후에, 그 테스트 케이스를 통과하기
위한 최소한의 코드를 작성한다.
※ 장점.
1. 코드의 모듈화
- 코드를 작성할 때 코드가 방대해지지 않고 모듈화가 이루어진다.
따라서 리팩토링이 쉬워진다.
2. 디버깅 시간 단축
- 구현한 기능이 요구사항을 충족하는지, 버그에 대한 낭비 시간도 줄여준다!
단위 테스트 Unit Test
- 개발자가 수행하고 자신이 개발한 코드 단위를 테스트합니다. 소스 코드의 개별 단위를 테스트하며 사용 할 준비가
되었는지 확인하는 테스트 방법
- 개발 라이프 사이클의 초기 단계에서 버그가 식별되므로 버그 수정비용을 줄이는 데 도움이 된다.
⭕ 단위 테스트의 조건
1. 독립적이어야 한다. 어떤 테스트도 다른 테스트에 의존하지 않아야 한다.
2. 격리 되어야 한다. Ajax, Axios, LocalStorage 등 테스트 대상이 의존하는 것을 다른 것으로 대체해야 한다.
⭕ 단위 테스트를 하는 이유
1. 프로그램이 크고, 메모리가 많이 들거나 DB 등이 필요한 경우 로컬 환경에서 쉽게 코드를 실행시켜보기 어렵기 때문에
유닛 테스트를 만들어 빠르게 자신의 코드가 정상적으로 작동하는 지 확인 할 수 있다.
2. 종속성이 있는 다른 클래스들에서 버그가 나는 것을 방지하기 위해서이다!
JEST
- Facebook에 의해 만들어진 테스팅 프레임 워크
- Test Case를 만들어 어플이 잘 돌아가는지 테스트 해준다.
// Package.json
  "scripts": {
    "test": "jest"
  }
⭕ Jest에서 Test 파일을 찾는 방법
1. __test__ 폴더 안에 있는 모든 파일들
2. filename.test.js
3. filename.spec.js
Jest 구조
⭕ describe : 말하다 묘사하다 서술하다
- 여러 관련 테스트들을 그룹화하는 블록을 만든다.
⭕ It ( Test )
- 개별 테스트를 수행하는 곳
- 각 테스트를 작은 문장처럼 설명한다.
1. Expect: 예상하다.
- 값을 테스트 할 때마다 사용 Matcher 와 짝을 이루어서 사용한다.
2. Matcher : 어울리다. 일치하다
- 다른 방법으로 값을 테스트 하도록 Matcher를 사용
test("2+2 = 4", () => {
  expect(2 + 2).toBe(4);
});
- Describe로 묶어 사용하기.
describe("Calculation", () => {
  test("two plus tow is foure ", () => {
    expect(2 + 2).toBe(4);
  });
  test("two plus tow is foure ", () => {
    expect(2 + 2).not.toBe(5);
  });
});
⭕ jest.fn ()
- Mock 함수를 생성하는 함수, mock은 모의를 의미하며 단위 테스트를 작성할 때 해당 코드가 의존하는 부분을 가짜로
대체해준다. ( 단위 테스트를 독립적으로 유지하게끔 해준다. )
- 데이터 베이스에서 데이터를 삭제하는 코드를 사용한다고 가정하면 실제 데이터 베이스를 사용하는 경우 문제가 생길
수 있다. 테스트가 인프라 환경에 영향을 받게 되므로 좋지 않다.
⭕ 순서
1. 구현해야 할 목록 생각 및 함수 생성 => 단위 테스트 작성 => 실제 코드 작성.
⭕ Create 단위 테스트 해보기
1. product.test.js 를 작성해 준다.
ProductController의 createProduct가 함수인지 파악하는 테스트 이다.
const productController = require("../../controller/products");

describe("Product Controller Create가 함수인가", () => {
  it("함수일 것", () => {
    expect(typeof productController.createProduct).toBe("function");
  });
});
2. createProduct 함수를 호출 할 때 Product Model의 Create 메소드가 호출이 되는지 확인해보기
// controller/products.js

const productModel = require('../models/Product');

const createProduct = () => {
    productModel.create();
}

module.exports = {createProduct}
// products.test.js
const productController = require('../../controller/products');
const productModel = require('../../models/Product');
// mock함수
productModel.create = jest.fn();
describe("Product Controller Create", () => {
it("should have a createProduct function", () => {
// ProductController에 createProduct가 함수인지 파악하는것
// 예상을 하면서 만드는것
expect(typeof productController.createProduct).toBe("function");
})
it("should call ProductModel.create", () => {
productController.createProduct();
// productController의 createProduct가 실행될때
// productModel의 create가 호출되는지 확인
// DB에 직접적인 영향을 받으면 안되기 때문에
// mock함수인 jest.fn()을 확인한다.
expect(productModel.create).toBeCalled();
})
})- 단위테스트는 독립적으로 이루어져야 하고 또한 실제 productModel에 영향을 받아 직접 호출되면 안되기 때문에
jest.fn()을 활용한다.
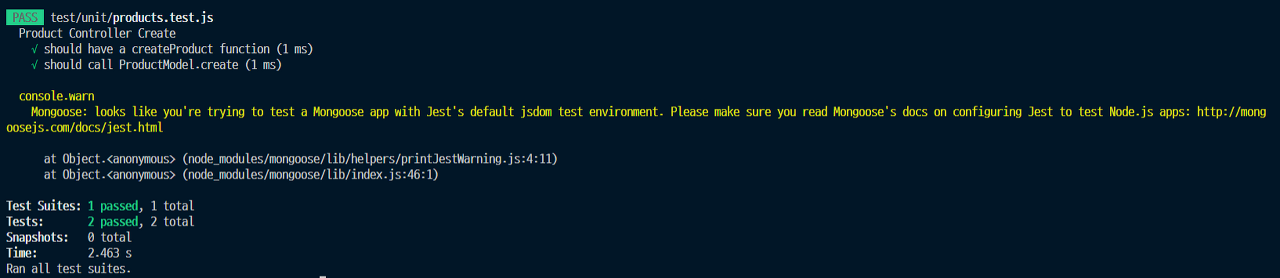
- 테스트를 통과 하지만 나오는 경고 문구로써
몽구스를 사용할 때 나오는 경고 메시지이다. jest 기본 test 환경은 jsdom으로 되어 있는데 mongoose 는 jsdom을
지원하지 않으므로 경고 문구가 발생하게 된다.
이에 따라 test 환경을 jsdom에서 node로 변경해 주면 된다.
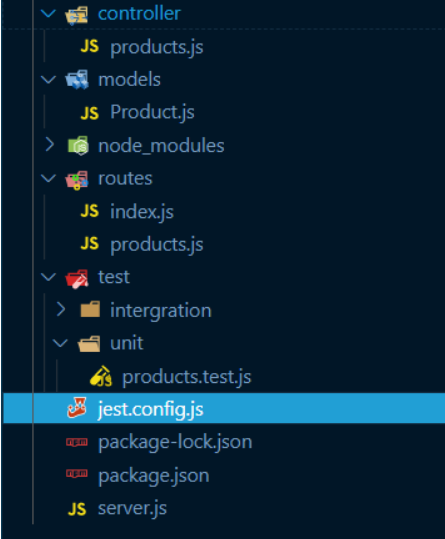
이를 위해 jest.config.js를 작성해 준다.
// jest.config.js

module.exports = {
    testEnvironment: "node"
}
⭕ node-mocks-http
- 현재 Product.create()는 아직 저장할 Product 데이터를 넣어주지 않는다. 이제 DB에 저장할 데이터를 넣어준다.
- 원래 몽구스 모델을 이용해 데이터를 저장할 때 Product.create(req.body) 등으로 http요청으로 함께 들어온 body를
create 메소드에 인자로 넣어줘서 DB에 저장하는데 테스트환경에서는 위와같은 방식으로 진행할 수 없기 때문에
node-mocks-http 라이브러리를 사용한다.
- 먼저 더미 데티러를 넣는 방식을 위해 json 형식의 더미 데이터를 만들어 준다.
// data/new-product.json

{
  "name": "Chicken",
  "description": "delicious",
  "price": 16000
}
// controller/product.js
const productModel = require('../models/Product');
const createProduct = (req, res, next) => {
productModel.create(req.body);
}
module.exports = {createProduct}
- httpMocks를 통해 request와 response를 작성하고 req.body안에 json으로 생성한 더미데이터를 넣어주었다.
⭕ beforeEach : 각자 앞에
- 여러 개의 테스트에 공통된 Code가 있다면 beforeEach안에 넣어 반복을 줄여 줄 수 있다.

- 해당 부분은 앞으로도 중복적으로 사용할 것이기에 beforeEach로 빼줄 수 있다.
const productController = require("../../controller/products");
const productModel = require("../../models/Product");

const httpMocks = require("node-mocks-http");
const newProduct = require("../data/new-product.json");

// mock 함수
productModel.create = jest.fn();

let req, res, next;

beforeEach(() => {
  req = httpMocks.createRequest();
  res = httpMocks.createResponse();
  next = null;
});

describe("프로덕트 컨트롤러 Create 함수", () => {
  beforeEach(() => {
    req.body = newProduct;
  });

  it("createProduct 함수일 것이다.", () => {
    // ProductController에 createProduct가 함수인지 파악하는것
    // 예상을 하면서 만드는것
    expect(typeof productController.createProduct).toBe("function");
  });

  it("프로덕트 컨트롤러의 크리에이트프로덕트 함수를 호출하면 프로덕트 모델의 크리에읕 함수가 호출 될 것이다.", () => {
    // req.body에 newProduct를 넣어준다.
    req.body = newProduct;
    productController.createProduct(req, res, next);
    // productController의 createProduct가 실행될 때
    // productModel의 create가 호출 되는지 확인한다.
    // DB에 직접적은 영향을 주면 안되기 때문에
    // mock 함수인 jest.fn()을 사용하여 확인한다.
    expect(productModel.create).toBeCalledWith(newProduct);
  });
});
⭕ 상태값 전달하기
- 요청이 성공적으로 처리되는 경우 자원이 생성되었을 때 HTTP 응답 코드로써 201을 사용한다.
- productController의 createProduct가 실제로 성공적으로 동작하게 되면 201 response Code를 반환해야 한다.
이에 따라서 product.test.js에 201을 return 하는지 테스트하는 테스트 코드를 넣어준다.
- 위 코드로 테스트를 하면 200이 return 되어 에러가 발생한다. 따라서 controller/product.js 또한 수정해줘야 한다.
// controller/product.js
const productModel = require('../models/Product');

const createProduct = (req, res, next) => {
    productModel.create(req.body);
    res.status(201).send();
}

module.exports = {createProduct}
const productController = require("../../controller/products");
const productModel = require("../../models/Product");
const httpMocks = require("node-mocks-http");
const newProduct = require("../data/new-product.json");
// mock 함수
productModel.create = jest.fn();
let req, res, next;
beforeEach(() => {
req = httpMocks.createRequest();
res = httpMocks.createResponse();
next = null;
});
describe("프로덕트 컨트롤러 Create 함수", () => {
beforeEach(() => {
req.body = newProduct;
});
it("createProduct 함수일 것이다.", () => {
// ProductController에 createProduct가 함수인지 파악하는것
// 예상을 하면서 만드는것
expect(typeof productController.createProduct).toBe("function");
});
it("프로덕트 컨트롤러의 크리에이트프로덕트 함수를 호출하면 프로덕트 모델의 크리에읕 함수가 호출 될 것이다.", () => {
// req.body에 newProduct를 넣어준다.
req.body = newProduct;
productController.createProduct(req, res, next);
// productController의 createProduct가 실행될 때
// productModel의 create가 호출 되는지 확인한다.
// DB에 직접적은 영향을 주면 안되기 때문에
// mock 함수인 jest.fn()을 사용하여 확인한다.
expect(productModel.create).toBeCalledWith(newProduct);
});
// data를 성공적으로 create시 201 반환
it("201 응답 코드를 반환할 것임", () => {
productController.createProduct(req, res, next);
expect(res.statusCode).toBe(201);
expect(res._isEndCalled()).toBeTruthy();
});
});
⭕ 에러 핸들링하기
// routes/products.js

const express = require("express");
const router = express.Router();
const { createProduct } = require("../controller/products");

router.post("/", createProduct);

module.exports = router;
// controller/products.js
const productModel = require('../models/Product');
const createProduct = (req, res, next) => {
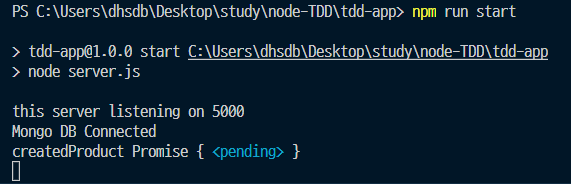
const createdProduct = productModel.create(req.body);
console.log('createdProduct', createdProduct);
return res.status(201).json(createdProduct);
}
module.exports = {createProduct}- 요청을 보내게 되면 pending 상태가 되기에 async await 비동기 코드를 사용해야 한다.
-
// controller/products.js

const productModel = require('../models/Product');

const createProduct = async(req, res, next) => {
    const createdProduct = await productModel.create(req.body);
    console.log('createdProduct', createdProduct);
    return res.status(201).json(createdProduct);
}

module.exports = {createProduct}
- 요청이 정상적으로 완료되었으므로 async await을 실제 코드에도 적용했다면 test code 또한 async await을
적용해야한다.
const productController = require("../../controller/products");
const productModel = require("../../models/Product");

const httpMocks = require("node-mocks-http");
const newProduct = require("../data/new-product.json");

// mock 함수
productModel.create = jest.fn();

let req, res, next;

beforeEach(() => {
  req = httpMocks.createRequest();
  res = httpMocks.createResponse();
  next = null;
});

describe("프로덕트 컨트롤러 Create 함수", () => {
  beforeEach(() => {
    req.body = newProduct;
  });

  it("createProduct 함수일 것이다.", () => {
    // ProductController에 createProduct가 함수인지 파악하는것
    // 예상을 하면서 만드는것
    expect(typeof productController.createProduct).toBe("function");
  });

  it("프로덕트 컨트롤러의 크리에이트프로덕트 함수를 호출하면 프로덕트 모델의 크리에읕 함수가 호출 될 것이다.", async () => {
    // req.body에 newProduct를 넣어준다.
    req.body = newProduct;

    await productController.createProduct(req, res, next);
    // productController의 createProduct가 실행될 때
    // productModel의 create가 호출 되는지 확인한다.
    // DB에 직접적은 영향을 주면 안되기 때문에
    // mock 함수인 jest.fn()을 사용하여 확인한다.
    expect(productModel.create).toBeCalledWith(newProduct);
  });

  // data를 성공적으로 create시 201 반환
  it("201 응답 코드를 반환할 것임", async () => {
    await productController.createProduct(req, res, next);
    expect(res.statusCode).toBe(201);
    expect(res._isEndCalled()).toBeTruthy();
  });

  it("응답 코드에 json body를 반환할 것임", async () => {
    productModel.create.mockReturnValue(newProduct);
    await productController.createProduct(req, res, next);
    // res json data가 newProduct와 일치하는지 여부
    expect(res._getJSONData()).toStrictEqual(newProduct);
  });
});
⭕ 요청이 정상적으로 오지 않았을 때의 경우를 처리해주어야 한다. try-catch를 활용해 에러 코드 방법을 나눠준다.
// controller/product.js

const productModel = require("../models/Product");

const createProduct = async (req, res, next) => {
  try {
    const createdProduct = await productModel.create(req.body);
    console.log("createdProduct", createdProduct);
    return res.status(201).json(createdProduct);
  } catch (error) {
    next(error);
  }
};

module.exports = { createProduct };
- error 발생 시 error 메세지를 next를 통해 넘겨주는 방식이다.
const productController = require("../../controller/products");
const productModel = require("../../models/Product");

const httpMocks = require("node-mocks-http");
const newProduct = require("../data/new-product.json");

// mock 함수
productModel.create = jest.fn();

let req, res, next;

beforeEach(() => {
  req = httpMocks.createRequest();
  res = httpMocks.createResponse();
  next = jest.fn();
});

describe("프로덕트 컨트롤러 Create 함수", () => {
  beforeEach(() => {
    req.body = newProduct;
  });

  it("createProduct 함수일 것이다.", () => {
    // ProductController에 createProduct가 함수인지 파악하는것
    // 예상을 하면서 만드는것
    expect(typeof productController.createProduct).toBe("function");
  });

  it("프로덕트 컨트롤러의 크리에이트프로덕트 함수를 호출하면 프로덕트 모델의 크리에읕 함수가 호출 될 것이다.", async () => {
    // req.body에 newProduct를 넣어준다.
    req.body = newProduct;

    await productController.createProduct(req, res, next);
    // productController의 createProduct가 실행될 때
    // productModel의 create가 호출 되는지 확인한다.
    // DB에 직접적은 영향을 주면 안되기 때문에
    // mock 함수인 jest.fn()을 사용하여 확인한다.
    expect(productModel.create).toBeCalledWith(newProduct);
  });

  // data를 성공적으로 create시 201 반환
  it("201 응답 코드를 반환할 것임", async () => {
    await productController.createProduct(req, res, next);
    expect(res.statusCode).toBe(201);
    expect(res._isEndCalled()).toBeTruthy();
  });

  it("응답 코드에 json body를 반환할 것임", async () => {
    productModel.create.mockReturnValue(newProduct);
    await productController.createProduct(req, res, next);
    // res json data가 newProduct와 일치하는지 여부
    expect(res._getJSONData()).toStrictEqual(newProduct);
  });

  it("에러 반환 메시지 확인!!", async () => {
    const errorMessage = { message: "description property missing" };
    const rejectedPromise = Promise.reject(errorMessage);
    productModel.create.mockReturnValue(rejectedPromise);
    await productController.createProduct(req, res, next);
    expect(next).toBeCalledWith(errorMessage);
  });
});
- next 부분을 jest.fn을활용해서 mock 함수로 넣어주었다. next에 인자를 넣어 넘겨주면 그 다음 부분의 미들웨어에서
해당 next의 인자를 가지고 처리할 수 있게 된다.
TDD - Node 로 TTD하기 2 (단위테스트와 통합테스트)
github.com/loy124/node-express-tdd loy124/node-express-tdd express에서 jest와 supertest를 활용한 단위 테스트및 통합 테스트 . Contribute to loy124/node-express-tdd development by creating an account..
loy124.tistory.com